Showing posts with label Retro Bicycles. Show all posts

My new-old Huffy Cranbrook daily rider Beach Cruiser


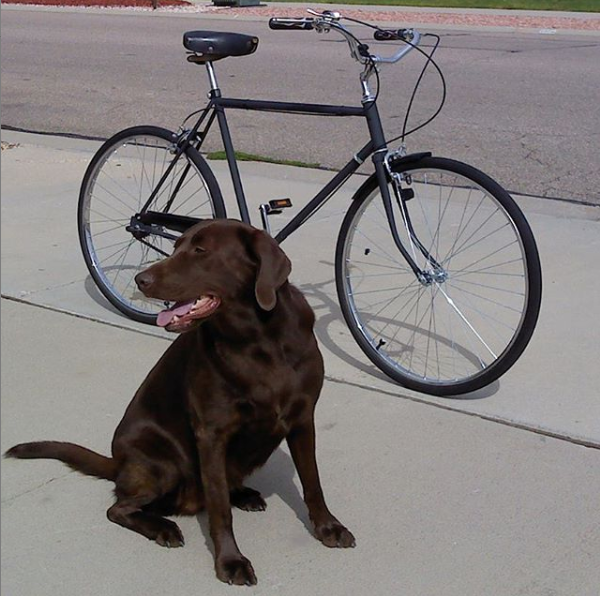
2012-ish Huffy Cranbrook 26" Men's Cruiser

Pretty nifty looking Beach Cruiser right? It was originally bought for my son, but he hasn't used it in years. Wanting a new daily rider for myself, I commandeered the bike and spent a few days getting it into shape.

I was originally going to give this bike away, as I am not a fan of post 80s Huffy bikes. I remember Huffy being a solid brand when I was a kid, but am not a fan these days. I will share a few of the things I dislike about the bike in this article, what it took to get it in shape, and upgrades I performed.

The Cranbrook.. pre 'Glow Up'

This bike had been hanging on my garage wall for quite sometime sans handlebars. The reason being, the gooseneck that held the handlebars was absolute garbage. I took it on a ride a few years back, and the handlebars moved back and forth easily in the course of a low impact relaxing ride. I tightened it up as much as I possibly could, yet the handle bars still moved. What's more, the gooseneck got twisted and bent out of shape from tightening it up. 

Needless to say, the gooseneck was the first thing I ordered up for the bike. I simply measured the width of both the fork tube opening and gooseneck stem and ordered one up on Amazon. Most goosenecks are sold with a millimeter measurement, so if you don't have a metric ruler, you can convert the measurement from inches to millimeters here using Google.


I like a good amount of handlebar height on my Beach Cruisers, so I made sure to get one with a little extra length to it. The black electroplating finish went nicely with the bikes new color scheme as well.


A quite easy and affordable upgrade was adding new grips. These 'Torpedo Grips' are comfortable and add a great retro look to the bike.

Pro Tip: When installing new grips, spray the handlebar or inside of the grip with hairspray. The grip will slide over the handlebar incredibly easy. After a short time, the hairspray will dry and the grips will hold super tight.


Thank the maker for cheap pinstriping

I've never been one for pinstripes on bikes, so I immediately set my sights on removing all graphics from it. This was not my first rodeo, so I was ready to break out the heat gun to assist me. However, the combination of cheap stickers and 95 degree Florida heat on this day, made them a dream to remove. I didn't even need any solvent or alcohol for cleanup.


The seat was the next item slated for replacement. Even though this bike had less than 50 miles on it, the stock seat was awful and terribly uncomfortable.


I got this seat for around $24.00.
Super comfortable and eye appealing!


I hate these tension seat clamps. I get why they are a great idea for the novice rider, people who share bikes, or someone that simply doesn't like to break out the tools every time they want to raise or lower their seat. In my experience however, many of these set ups are cheaply made, and lose tension over time, letting the seat post slide into the frame's down tube. 

Since the clamp itself is spot welded to the frame, I would have to grind and cut it off. I may replace it with an honest to goodness seat post clamp if the assembly starts failing.


This bike has never been ridden in the mud or rain, and has been garaged its whole life. However, the bearing cups are of such poor quality, they are already rusting.


The welds on this frame are absolutely horrid. Sloppy, with pits and holes. A perfect way for moisture to take hold, and for rust to start attacking the structural integrity from the inside out.

So all in all, while the bike is not one I would depend on for years to come, I'm sure it will suffice for a summer or two and looks pretty sharp to boot. The cranks, rims and frame are not of very good quality, so I will be subtly keeping an eye out for another project bike. If I happen to come across anything good.. I will make sure to share it here with you.


1979 Montgomery Wards Open Road 3 speed bike rebuild


In 2011, I found this gem at a Colorado thrift store for just twenty clams. She was in great shape and ride-able to boot. It was obvious from the wear, or lack thereof.. that it was only ridden occasionally. Major oxidation of the paint gave me a clue it had been stored outside for quite some time. Thanks to the thick coats of paint they sprayed on bikes back in the day, she was only rusted where nicks and pits in the finish were present.

The bike was a little rough with non working brakes, shifter, rusted chain, and severely oxidized paint.  However, if you could look past all of that, you'd see a bike with great bones. When I got it home, I immediately took it for a quick spin. It rode smoothly and all moving parts had tight tolerances. Thirty two years later, every part on the bike was original from the factory.


Open Road was a brand of bikes sold at Montgomery Ward department stores back in the day. They were immensely popular because they were solidly built and sold at an affordable price. Many of my friends growing up had Open Road bikes, and they all loved them.


 Three speed Shimano rear hub

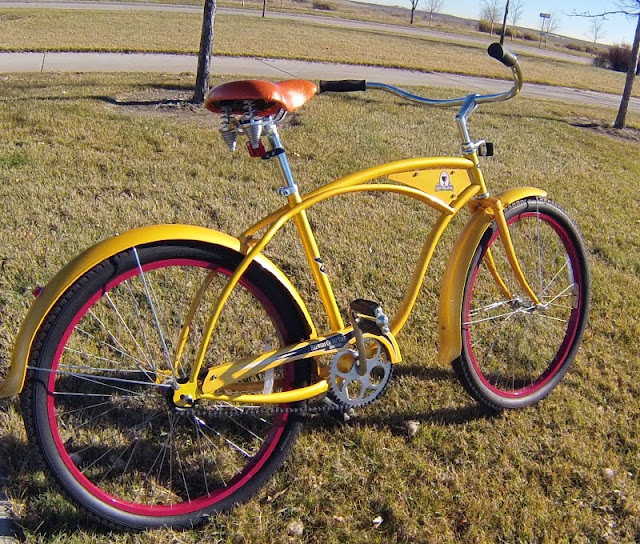
The three gear hub needed nothing more than cleaned and oiled. This 30 year old plus Shimano hub (and bike for that matter) was made back when things were built to last. Later in the day, I sat in front of the bike in my garage simply to admire it. The yellow paint, the orange & brown graphics and handlebar grips, just screamed 1979.


Single speed and 3-speed bikes were my life as a kid, so once I got a wrench in hand, I had the bike stripped down to the frame in under fifteen minutes.  


Another clue that this bike had a pretty easy life, was the condition of the crank and fork bearings.  The bearing grease on both sets of bearings was clean and translucent, with the bearings showing little to no wear.

After 1/2 hour of grinding, sanding and priming

My vision for the bicycle was an unassuming road bike with a sleeper look to it, and flat black was the color I settled on. I already had a few bells and whistles in my possession to outfit her with, so the cost for this build was going to be minimal.


Sure.. it needed a little TLC to get it back to its present state, but these old bikes were built to last, and it wasn't an ordeal to get her back in tip top shape. I've bought new bikes during the last three decades, that were worth nothing more than scrap metal in under five years. There's no doubt in my mind that if properly cared for, this bike would make it another thirty years no problem.

After the bike was finished, I would load it up on the back of my car and take it to work with me a few days a week. After work, I would drive to one of the many Colorado bike trails. I would unload the bike and go for a nice leisurely ride for one or two hours. 

One day at quitting time, a co-worker passing by saw the bike and came over to check it out. He said "Man.. that bike looks mean!" I said "Thanks! That's exactly what I was going for." It was quite the compliment, and I was super proud.

Mods and Flair..
One change I decided not to make was in regards to the handlebars. I had an extra set of Beach Cruiser bars, so I installed them. As soon as I did I kicked myself for doing so. The bars totally killed the feel and look I was going for. I opted to use the original bars that came with the bike, and absolutely loved the retro look.  When the bike was finished, I couldn't believe I toyed with the idea of ditching them.


Another thing I left alone was the seat.  The tattered, broken-in look, lent immensely to the bikes character. The style of the seat itself added to the bike's slightly aggressive look.

Big fenders look cool on bikes, but even as a kid I always thought that most were overkill.  I knew this bike needed fenders to pull off the look I was shooting for, so I came up with a simple solution for modifying them.


The rear part of the fender with the brace that ran to the wheel axle is what needed to go. I took a pencil and marked off a cut point about six inches behind the fork mounting bracket. I carefully trimmed along the line with tin snips, and then sanded down the edge smooth.


After a quick sanding, priming, and three coats of gloss black paint, this was the result. While I originally wanted the bike to be entirely flat black, it just didn't look right when I started putting it back together.  Therefore, I repainted the front fender and chain guard gloss black to give the bike some subtle contrast.


A new non-retro item I did add to this bike, was a low profile wireless bike computer. It was actually a gift from my old man, who is also huge bicycle enthusiast.  


This little unit had a clock, odometer, speedometer, counted calories and fat burned, tracked workouts, top speed, and even displayed the temperature. It proved to be invaluable for my afternoon and weekend rides. I still have this in one of my bike part storage boxes and plan on using it again very soon.


Snazzy retro valve stem caps


One of the only parts I had to totally replace, was the three speed shifter switch and cable. I found an unused piece on eBay for about $9.00. The cable was a few inches longer than what I needed, but it worked just fine.  As you can see.. I added a little flair to the bike with some Electra flame grips that I had laying around.


Man's best friend(s)

So needless to say.. I was pretty happy with the outcome of this particular bike project.  The grand total spent on the bike as you see it was $40.00. I ended up spending another $30.00 on it later on down the road for some new tires and a seat bag.

After a year of riding this bike and probably putting around 600 miles or so on it, I decided to giver her another spruce up. I found myself missing the original colors she once brandished, and decided it was time for a retro glow up. Below was the result..


Earth tones were the name of the game this time around! I repainted the frame a shade of tan, and the chain guard & seat post a light brown. I outfitted the bike with accessories that I had lying around like suede handlebar grips, a comfy brown springer seat, and a wood rear rack. The only expense incurred, was some new beautiful gum wall tires, which pulled the whole 70s retro look together. 

I derive a great deal of satisfaction from bike projects like this one. If not for the issue of storage space, I would have an endless string of bike builds to keep me busy. That being said, I do have a new project I just completed that I will be posting about next week. It's a bike of my Son's that he no longer rides, that I have commandeered as my new daily rider. Stay tuned..


My 'Fat Tire' Beach Cruiser from New Belgium Brewing


If you weren't aware, the New Belgium Brewing Company has been releasing limited edition beach cruisers yearly since 1999. Many enthusiasts referred to the early models as Fat Tire Bikes, a nod to the brewery's flagship beer Fat Tire Amber Ale.

Fat Tire put New Belgium Brewing on the map, and helped to start a micro brew revolution in Colorado and quite likely across the nation. With every passing year comes a new model of beach cruiser entirely different from the last, and unique unto itself. 

The bikes are reserved as gifts for New Belgium employees when they reach their one year anniversary with the company. However, they are also offered to the general public via fund raising auctions, raffles, and the occasional promotional giveaway. Needless to say, it's not very easy to get your hands on one. Sure you've got the secondary market with auctions on eBay etc, but you can pay a pretty penny for them.

New Belgium Brewery Bikes
A sea of Fat Tire Bikes at New Belgium Brewery in Fort Collins, CO.


Living close by the New Belgium headquarters in Fort Collins for so many years, afforded me opportunities to see many a Fat Tire bike in the wild. Several local restaurants and bars display them and work them into their decor. Taking a stroll in old Town Fort Collins almost always yields sightings of New Belgium bikes parked about town and secured to bicycle racks.   

Fat Tire Bike in Old town Fort Collins
Fat Tire Bike at the old Beau Jo's Pizza in Old Town Fort Collins

As both a beach cruiser enthusiast and huge fan of New Belgium Brewing, I always had my heart set on owning one of their beach cruiser bikes. 2013 was the year my wish came true.


Fat Tire bike at Greeley Old Chicago
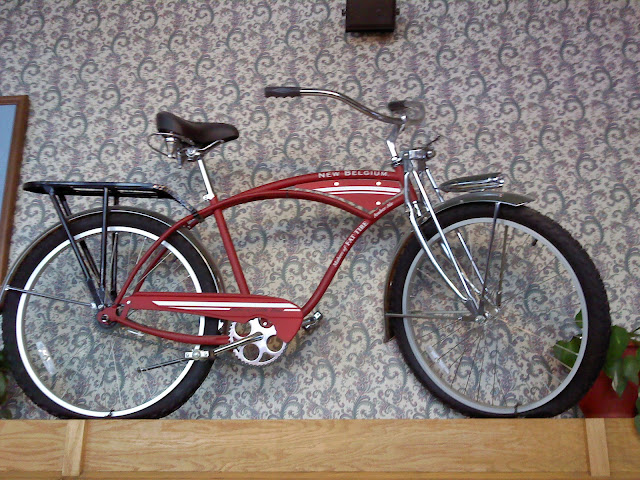
My bike as it sat for the better part of ten years

The Fat Tire Cruiser pictured above, hung from the ceiling as part of the restaurant decor at a local Old Chicago restaurant in Greeley Colorado for quite some time. I actually snapped this picture above on a Sunday afternoon in 2008 as some friends and I watched a Denver Broncos game, whilst feasting on pizza and wings.

Due to a remodel in 2013, the bike came down and I was sure I'd never see it again. However, it appeared once again during a "Movember" fund raiser that Old Chicago was throwing. It went on the block for a silent auction to raise money for prostate cancer research. I originally had plans to join my buddies for an evening of fun filled events, but had to attend a choir concert at my kids school.  

Knowing that I was a single speed bike and beach cruiser fanatic, my friend got a hold of me and said that the bike was up for auction. He asked me if I wanted him to bid on it for me. I told him "ABSOLUTELY" and notified him what I could afford to pay, which was $150.00. Whether folks didn't know exactly what kind of treasure they were bidding on, or there was simply a lack of retro bike enthusiasts in the house remains to be seen, but my buddy put in my modest bid, and the bike was mine.


New Belgium brewery
The same Fat Tire model, as it hangs in the New Belgium Brewing facility

After my kids choir concert had finished, I met up with my friends at Old Chicago and took a gander at the newest addition to my retro bicycle collection. The bike is New Belgiums's 2000 model made by the Electra Bicycle Company, and was the second year these New Belgium Fat Tire bikes were produced.


New Belgium Beach Cruiser
2000 New Belgium Beach Cruiser

At the end of the night, my friend stated there was one condition to me taking  possession of the bike. He said I needed to ride the bike across the snow and ice covered parking lot to my car. Growing up in Colorado this was no tall order, but riding a bike in snow and ice is something I hadn't done since I was a teenager. However, the Electra branded tires gripped perfectly and kept me from making a fool out of.. and or injuring myself.

I kept the bike in its original condition, apart from adding a New Belgium branded bike bell and valve stem caps that I bought at the New Belgium Brewery. 

I've always had an immense amount of respect for the New Belgium Brewing Company. Their never ending efforts in becoming a more sustainable and green company are both impressive and admirable, especially when it's much easier and affordable to go the opposite way.  

Ten years later, I still own the bike. I take it out for a ride a few times a year, and give it a semi-annual dusting and polishing. For me, a New Belgium bike.. any model of New Belgium bike is certainly an honor to own, and I'll always cherish this bike. 

Visit New Belgium Online

1970s Open Road 3-speed bicycle rebuild. Memories of old bikes on Lockdown day 56

I had a 3-speed Open Road bicycle from the 70s that I bought for $20.00 at a thrift store. It didn't need much except some TLC. Here's a 2-minute video I made yesterday showcasing the build.  I really do miss that bike.  I absolutely love single speeds and 3-speed bicycles.


Adding retro flair to your beach cruiser or old bike with grips - Lockdown Day 54


I circled around to my bicycle obsession this weekend, perusing online shops for hours, searching for new ways to customize my bikes.

Handlebar grips are a great way to pull the whole color scheme of your cruiser bike together.  The right kind of grips can bring life to an area of a bike that doesn't have a whole lot going on color wise.  There are lots of options out there in regards to grips these days, and here are a few styles readily available for purchase online and in stores..


 Torpedo Grips
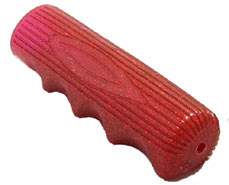
red torpedo bicycle handlebar grips


Retro torpedo style grips have been getting more popular in recent years.  In fact, I saw a pair of two tone gray and black torpedo grips in the bicycle section of Wal Mart this week for under $10.00.  This set of red torpedo grips are made by a company called Hunt-Wilde, and I bought them from BikeWorldUSA's store on Amazon.com for about $15.00 a while back.


 Pistol Grips


Pistol Grips bicycle handlebar grips

Pistol grips definitely have a retro look about them, and with just cause.  This type of grip was a staple of numerous bicycle companies for many years.  New pistol grips range anywhere from $2.00 to $15.00 on eBay, Amazon, and online Bicycle supply sites.


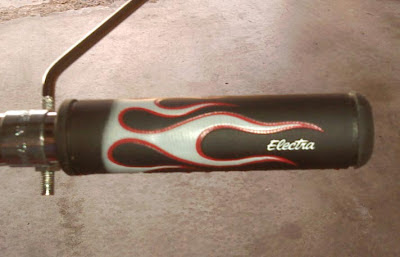
Electra Rat Rod flame grips
Electra bicycle handlebar grips

Electra makes comfortable and incredible looking grips in all kinds of patterns and color schemes.  I've seen them on eBay, Amazon, and online bike stores usually ranging from $10.00 to $15.00.


Leather Townie Grips

Townie bicycle handlebar grips

"Townies" are also a popular style of grips.  You can get them in virtually any color, and if you look close, there's even a little hole punched through the end caps.  These grips easily accommodate those way cool steamers that flow so beautifully in the wind.


handle bar streamers for bicycles

I actually thought about putting a set of silver and red streamers on my bike for laughs, but I already get enough ribbing from folks about how my Schwinn is "The Pee Wee Herman Bike".


Lockdown Day 29 - More Bicycle Building


So after a day of tiring work, I decided to tackle some projects at a leisurely pace.  Here's what kept me busy for most of the day..


  • Organized the attic
  • Assembled and tuned another Beach Cruiser
  • Disassembled and repacked the wheel bearings on a Razor Scooter
  • Cleaned up and tuned a fishing rod and reel
  • Unclogged the sink in my Master Bathroom


It was one of those days that I felt like keeping busy with enjoyable projects.  Apart from cleaning out the bathroom sink, all of the other projects got me very Zen.


This is my very first fishing pole that was given to me at the age of seven. It's still very much functional and could be used tomorrow.  And.. as long as you didn't try to land a seven pound Bass with it, I'm sure it would still hold up.  I cleaned and oiled it up, and looked back upon some great memories I had with her.


I also tore down and repacked the bearings on a Razor Longboard Scooter, because.. why the heck not? My Son always had an affinity for scooters, and I forgot about this one up in the attic.  He took it out for a spin after I told him I had gotten it in shape once again.  Unfortunately, it was a few inches  too short for him to comfortably ride on.  I don't know what I'm going to do with it now.  Probably gift it to a neighbor whose kids might enjoy it.


And.. I put together yet another Beach Cruiser (That's four of them in my garage now).  This one simply needed to be put back together as it was disassembled and stored in the attic. I only needed to re-grease the front wheel bearings on this one.  I didn't go to hard on it cosmetically, only cleaning it up a bit. Not sure if I will strip it down and repaint it yet. Stripping the decals and a quick polish with my high speed buffer very well make it look like a new bike.


This is actually a pretty impressive bike made by Sun Bikes.  I believe it's got a 24 or 25 inch frame, but is outfitted with 26 inch rims.  It's incredibly light and rides like a dream.  It's the perfect size for someone who is under five and a half feet tall like my wife and daughters. If it starts getting ridden more, I'll give it a little more TLC.

I swear, I think the most zen that I have been through this whole Lockdown, is when I'm working on bikes.  Another lifetime ago, I at one time seriously thought about opening a bicycle shop.  It's probably a job that is perfectly suited to my personality.  I love to be calm and chill, but sometimes have trouble getting there.

Working on bicycles gets me in a good place very very quickly, and is very therapeutic and fulfilling.  I can't wait to get started on my next project, but am quickly running out of space to store any more bikes.  Fortunately, the next build I have in mind will be a space saver in regards to storage.  I just can't begin to look for a bike until this pandemic is over.  I may explore buying the frame and forks online if the shipping cost is right.

That's it for now folks.  Tomorrow will be one month that I've been home from work.  I think I'm going to compile a list of everything I've accomplished in that period of time.  I'll either be very impressed or very disappointed.  It's something I need to do however, as the days are blending together at this point. Until tomorrow..


How to adjust the handlebars on your Beach Cruiser


A short little video I made for the novice, on how to adjust the handlebars on a Beach Cruiser. While I'm catering to new members of the Beach Cruiser community, it's pretty much the same method for most other bikes as well.

Check it out if your bicycle just doesn't feel right to you while steering, or navigating the trails & streets.


My 1963 Schwinn American Deluxe Rebuild - Part Two


So.. my beautiful German Girl "Olga" a 1963 Schwinn American Deluxe, is now pretty much complete.  In Part One of this blog post, I shared some of the things I did to start getting her back in shape.  In this post, I'll share the steps it took to get her back together.  The last blog post ended with the poor old Gal disassembled and hanging on the wall of my garage.  I started to subconsciously ignore her again, but I would then see old bikes like the ones below in my travels, and that fire started burning to once again move forward on the project.

Retro Bike

Old bikes I stumbled upon that motivated me to keep going

Old 3 wheeled Bicycle


I Pulled her down from her perch on the wall, and spent an afternoon prepping her or paint.  I grinded, sanded, and primered the frame and forks, and let her sit for a couple of days to cure.


I went out and bought a beautiful Fire Engine Red paint to coat her with, and the results were stunning.. 


At long last!  She was ready to start putting back together.  However.. the bike then sat untouched from Fall 2018 to March 2020.  Over a year!  Why?  Well.. I touched on the subject in a recent blog post, and for reasons unbeknownst to me, the closer she got to getting completed, the more I avoided working on it.  This was my late Brother's bike and it's been in the family for years.  My Father couldn't bring himself to do too much with the bike and gifted it to me.  Now, it seemed as if I was experiencing the same dilemma.  I had issues I never dealt with about my Brother's passing, and it was now manifesting itself by me procrastinating, avoiding, and even ignoring the unfinished bike.

Fast forward to the great Corona Virus lockdown of 2020.  With no job to report to, I filled my days with projects to keep myself sane.  Finally, one day I stood in my garage looking up at the old Gal and said to myself  "That's it..  it's been long enough".  After that, it probably only took me two weeks to finish the project I started two years earlier.

The bike was all there, but needed some finishing touches and upgrades.  I ordered a longer seat post and new seat, and then began putting the rest of the bike back together.


1963 Messinger SeatSpringer Seat
Original 1963 Messinger Seat
In need of total reconditioning, I opted to buy a new seat so I didn't have to put off the bike build any longer.


 New 'UPANBIKE' Springer seat


I love this seat that I ordered off of Amazon, but had two big problems with it.  The first was the 'UPANBIKE' logo brandished across the back of the seat.  This was NOT reflected on the images shown online. Nevertheless.. it's something which I will remedy very soon.  The next problem was that it came with no mounting hardware!

Saved by my Bike hoarding tendencies!

Fortunately, I had several hardware sets from past builds and bikes I've owned.  I was still pretty irritated, but was happy I could actually test ride the bike soon.


Tank Horn Works!
Hardly had to do anything except clean the battery connections.


 Backup for the horn
I've owned this retro Electra brand bell for about seven years.  It was last installed on a 2013 Schwinn Legacy Cruiser that I gifted to someone before I left Colorado.  The bell perfectly compliments this bike, and adds some nice flair.


In the end, I opted not to restore the chain guard or tank.  I wanted to leave some of the bike's character intact.  A total restoration to me.. would look too clean, and I didn't want it looking like a reproduction bike bought right off of the rack.


One speed coaster hub
 Red Rocket caps I've owned & have been dying to use for years.

 Coaster Brake Hub repacked and spinning fine
The thing I was most nervous about on this build was the coaster brake hub.  I had not totally disassembled and reassembled one of these since 1985, and was scared I would mess something up.  However, it all came back to me once I was in there, and was ecstatic to find it functioned properly on my first ride.

Retro block Pedals

I still own the original pedals for this bike, but they're pretty rough.  I installed these retro block pedals which work like a charm and look era specific.


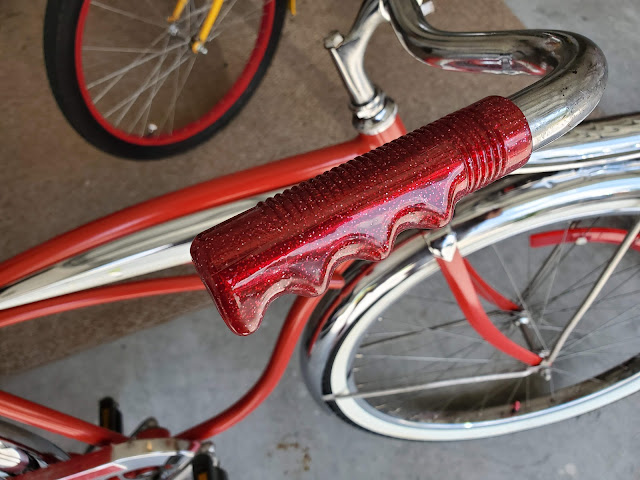
Not the original grips, but rather.. a suitable simile with groovy metal flake.

Red Metal Flake Grips


Repainted Head Badge courtesy of my daughter
I was entirely ready to buy a new old stock badge for around $20.00, and then decided to give my artsy daughter a shot at hand painting the old one for me.  She did a great job and I'm now waiting on new rust free screws to arrive in the mail so I can remount it.


Beautiful Retro Reflectors
I've also been holding onto these reflectors for about five years or so.  I was waiting for just the right project to use them on, and this bike and reflectors are a match made in heaven.


The only problem I ran into was a bent axle and worn bearings on the front rim.  In fact, my inaugural ride only lasted about four minutes for this reason.  It felt and sounded as if the bearings were going to be ground into a fine powder if I didn't cut my ride short.  I located a new axle set for a Schwinn S-7 rim for super cheap on eBay, but then decided to check my big box of spare parts.  Lo and Behold.. I found one buried at the bottom of the box that worked perfectly! 


BEFORE

restored bike

AFTER

Here's a few things left to do that aren't necessarily pressing..

  • Install a new Headset and bearings
    (The current setup is incredibly worn and I've ordered a new one)
  • Find an original Schwinn Headlight
    (The current is aftermarket)
  • Replace the cranks
    (The originals are a bit bent)
  • Replace the handlebars with a set that has no rust or damage

I may add some flair in the form of side mirrors and modified fenders, but we'll see.  The thing I really love about this bike, is that I can change it back to mostly original at any time.  It would be great to take it to some meets or shows this way someday.

After we're on the other side of this whole Covid mess, I hope to maybe join a local vintage or Schwinn group that holds meetups and cruises.  And.. if there aren't any groups to join, perhaps I'll create one.  All in all this was a great project that was very therapeutic for me.  There are still a few things I want to do to the bike.. but for now it's ready to ride, and that makes me incredibly happy.

Lastly, I sent some pictures to my Dad of the bike once it was altogether.  He was super impressed and said "Your Brother would be really impressed".  After this two year journey to get the bike done.. this is a really nice thought to ponder.  In the end, I guess it's partly a tribute of sorts to my Brother, and as long as I own it, I'll feel like a part of him will always be with me.