Rosie's Fried Green Tomato Sammich at DIsney's Hollywood Studios


Nestled in the back of Sunset Ranch Market on Sunset Boulevard in Disney's Hollywood Studios, sits Rosie's All American Cafe.  I got off of work early the other afternoon, and decided to hit the park to do some shopping.

I had skipped lunch and was quickly on the verge of getting "Hangry", so I made myself stop to get some fuel.  Having wanted to try Rosie's Fried Green Tomato Sandwich for quite some time, I ordered one up.  At $9.99, it definitely did not break the bank, and was served with a heaping helping of hot fries.


This beauty sported Fried Green Tomatoes topped with JalapeƱo Ranch Dressing, Pepper Jack, Red Tomatoes with Arugula on Ciabatta Bread.  It really did look and taste like something you would get in a nice sit down restaurant.


The sandwich was indeed as good as it looks.  Freshly made, the fried green tomatoes were piping hot, and the arugula and red tomato cold and crisp.  The only fault I could find with this sandwich, was with the jalapeno ranch.  Mind you.. the sauce was great, but I feel the sandwich just needed more of it.  The Ciabatta bread was nice and dense, so that combined with the breading of the fried green tomatoes, made for a bit more dryness that I normally don't like in a sandwich. 

But fear not! This problem can be simply remedied with your choice of spreads from the condiment bar nearby.  The condiment bar offers several options, so adding some mayo or hot sauce is a nice touch you can pull off yourself.  I opted to mix these two with just a wee bit of ketchup, concocting a spicy spread which nicely complimented the sandwich.  Of course.. you could ask for extra jalapeno ranch, which is what I might do next time.

So in closing, Rosie's Fried Green Tomato Sandwich is a tasty, affordable and super filling sandwich that will calm any "Hangry" beast very quickly.  I myself am a huge fan, and can't wait to enjoy another one very soon.


Successfully Relocating Across the Country

Followers of this blog may have noticed a lack of activity here during this last year.  There was a big reason for that, being.. relocating to Florida from Colorado.  At one point I almost started up a weekly blog about the whole process, but restrained for one main reason.  I didn't want the newness and excitement of the move to sway my thoughts.

I wanted to be as realistic and truthful as I possibly could about what it was like to move my family and everything I owned across the country.  Giving myself some time to settle into my new life, has given me good perspective and insight, and I feel it could help others that want to take the plunge and relocate to Florida, or cross country for that matter.

My bride and I have known for close to thirty years that we wanted to end up in Florida.  Why did we wait for so long?  We had three very good reasons.. our kids.  It just never seemed like there was an appropriate time to pull them out of their schools and make them start over somewhere else.  This happened to both my wife and I as young children, so we both know how that can adversely affect you as a child.  Needless to say, we had tons of time to research central Florida and plan out our move, which we got real resilient with during the last two years.

Plan, plan, and plan some more
The best piece of advice I feel I can give anyone in regards to making a move like this one, is to perform your due diligence with planning and research.  My last two years consisted of visiting central Florida on multiple occasions to research areas to live, and to get a feel for the local culture, the job market, schools, cost of living, quality of life, etc.

Even if you can't travel and visit the area as much as you'd like, the internet is an incredible resource if used right, to learn about all of these things.  I gained some great information on message boards and blogs, from local folks who were more than happy to help others who were thinking of relocating.  I must admit however, there is no substitute for getting your feet on the ground and really getting a feel for where you want to move.  Many areas that we were convinced we would love to live, turned out to be places we ended up scratching off of our list once we got the feel for said areas.

We have friends that live in central Florida who we came to visit on multiple occasions over the last two years.  Our friends proved to be an invaluable source of information for us.  Just look at some of the things we learned about from friends..

  • Local under performing schools
  • Undesirable areas of town
  • Cost of utilities
  • Cost of vehicle registration and driver licenses
  • Cost of living
  • Roads and Highways to avoid
  • Hot job markets and local pay scales
  • Public services
  • Florida house maintenance 101 (it's way different than Colorado)
  • Incredible value at local grocery stores

One of the biggest shocks I experienced during my research, was the local hourly pay rates.  My wages now, are actually half of what I was making in Colorado.  However, the cost of living in many ways is more affordable than Colorado.  Our electricity bill is double what we paid in Colorado, but my water, sewer, trash, cable, and internet are all lower.  Plus, I no longer have a natural gas bill.  Oh yeah, and there is NO state income tax in Florida!

All in all, I would say that I pay less in utilities here in Florida.  I make a lot less in wages, but I already knew this was going to be the case.  This being said, I made appropriate adjustments in my life so I could still live the same quality of life I lived in Colorado, in fact.. it's now a lot better.

Log what you learn
What personally helped me, was keeping a journal and spread sheets that documented new information I acquired about central Florida. I logged side by side comparisons of living expenses, deposit costs for utilities, the cost of auto and driver licensing, insurance rates, moving truck rates, road trip planning, and basically anything and everything that had to do with the relocation.

Nothing should be overlooked, and no detail is too small.  I'm the kind of person who doesn't like surprises, and I very much believe knowledge is power.  My sometimes obsessive method of gathering and reviewing information, helped us immensely in our move.  I had two years to fully plan my family's move, so I was able to take practically everything into account.  While you can't control everything in life, planning greatly improves your chances for success.  We hit a couple of bumps along the way while moving, but I was in a good state of mind, and aptly prepared to handle them.

Finally, and maybe the most important thing of all, is to give yourself some kind of a safety net.  If you have a good idea what your move is going to cost, increase that number as much as you possibly can.  I can almost guarantee that your expenses will surely exceed any number you've come up with, so give yourself a cushion.  This is not the type of move you want to make if you are tight on expenses, up to your eyeballs in debt, or living paycheck to paycheck.

Planning and preparation are definitely the key to successfully pulling off a relocation such as this.  It took awhile, but I'm finally settling into my new life.  This means I'm able to start buying out time once again for hobbies.. one of them being this very blog.  I look forward to getting back into the swing of things, and sharing all new Retro rants, musings, and adventures with you all.


My new SANDLOT Kitsch Shirt from RSVLTS

One of my favorite movies of all time is the 1993 coming of age flick.. 'The Sandlot'.  While it was set place in an era roughly fifteen years or so before I was a pre-teen, the movie resonated with me and reminded me of the simpler days when I was a child growing up in the 70s and 80s.

While the story was full of unique characters like 'Benny the Jet Rodriguez', 'Squints', and 'Smalls', my favorite character was Hamilton Porter aka 'The Great Hambino'.  Imagine my surprise when I learned of a great shirt design featuring his likeness!  Behold..


Yes.. in a world of Benny the Jet Rodriguez's, I'm a Hamilton Porter..
and I'm perfectly fine with that.


I absolutely love this shirt, and get compliments on it everywhere I go.  I am now a Superfan of RSVLTS, and am ordering more of their great shirts soon. I'll share my future purchases here.  

If you happen to be in the market for some unique and kitschy Dad shirts, visit the link below..


1970s CHIMO 10 speed retro bike rebuild

by Darrin Vindiola


Florida quite simply, is not the bicycling state that Colorado is.  In fact, we ranked #2 this year for most pedestrian and bicyclist deaths!  Needless to say, the biking culture here leaves something to be desired.  That being said, I feel bad that since I relocated here about a year ago from Colorado, I have not been very active in the hobby.  Thinking about the following retro bike rebuild however, makes me want to roll up my sleeves, start another project, and seek out new trails to explore.

During a home brewing session at my friend Mark's house a few summers ago, I noticed an old bike sitting under his deck, upside down, and covered in mud.  I inquired about the bike, and he explained that it was bought by his father in the mid 70s, who absolutely rode the heck out of it.  When Mark moved from Colorado to Arizona in the 90s as a young man, his dad handed the bike down to him, and Mark too put an incredible amount of miles on the bike on the streets of Phoenix.

The bike I'm referring to is pictured below.  It is a mid 70s 'Chimo Special' made by Hong Kong Bicycle (HKB) which is still in business to this very day.


Mark expressed that this bike had sat under his deck for over the last two decades.  He had always wanted to get the bike back into shape and give it back to his old man, but didn't know where to start, nor how to do it.  I immediately told him I'd be glad to tackle the restoration, and put a couple of my own bike projects on the back burner for my buddy.

So without further ado.. here are a slew of pictures, showing exactly what I had to work with, and the majority of steps that it took to get her back into shape.  Be forewarned that there are a ton of pictures accompanying this post.  Enjoy..


The first step of business was to knock the 20+ years of dirt off of it.


Mark was adamant that he wanted the decals on the bike preserved, so it would resemble its former self.  It was great luck that the HKB badge sticker on the head tube was in tact, but the "CHIMO" decals on the seat tube would have to be totally redone.


The chain was quite rusty and unbend-able.  I had a bit of struggle actually getting it off of the bike, but finally got it removed after about 5 minutes.  It's deplorable state scored it a two week long bath in rust remover and lubricant, followed by a good scrubbing with a wire brush.


There were some serious miles put on this bicycle, and no grease at all was left on the bearings.  Any grease remnants were caked onto the bearings and bearing cups.. baked with heat and friction into a hard crust.  Miraculously.. the crank, headset, and wheel bearings were all sound and totally reusable after cleaning and repacking.


 Shine baby shine!


When I delivered this bike to Mark, he asked how I got the steel to shine once again.  That question is easily answered in two parts..  patience, and a crap ton of steel wool.  I polished and scrubbed until it felt as if my fingers were going to fall off.  I believe you will see however, that the end results were worth it..


 BEFORE


AFTER


BEFORE


AFTER

 
I was able to save the pedals that were original to this bike.  After an oiling and cleaning, they were both good to go, and will last for years to come.


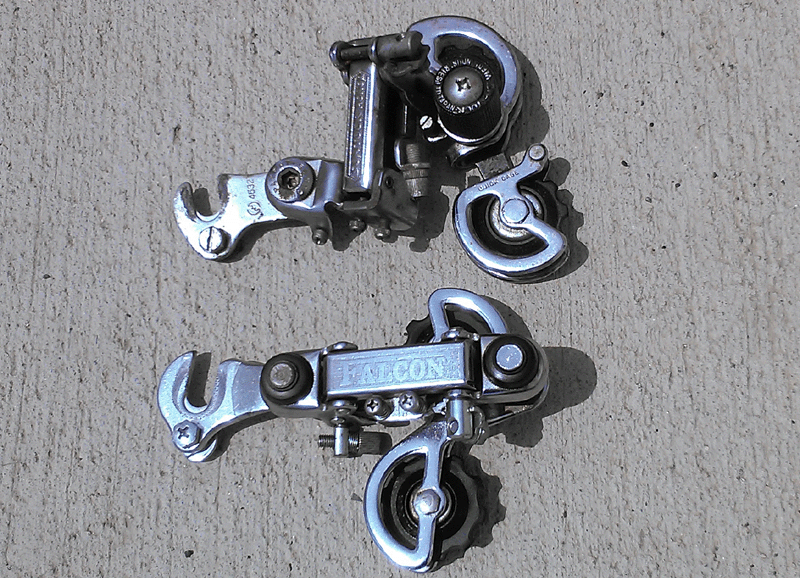
The front and rear Shimano derailleurs were totally shot, so I dug up a set of Falcon derailleurs from the same decade to swap them out with.  After a thorough cleaning, oiling, and polishing, they looked good as new, and worked perfectly.

Amazing what some steel wool and elbow grease can do!


 New gum-wall tires can really pull the look of a bike together, and give it a nice 70s vibe


 All tore down and ready for repaint prep


This is what she looked like after a few coats of new paint.  The head tube badge was in pretty good shape, so I simply taped it off before painting.

I re-lettered the down tube with the 'Chimo' name using some vinyl lettering, and wrapped the tube with some auto pin striping.  It wasn't an exact match of the font type, so I cut and trimmed the letters a bit to help it better resemble the original lettering.  Not an exact match mind you, but close enough to make the bike easily identifiable as an HKB Chimo.  Several layers of clear coat shot over the lettering will assure it stands up for quite some time. 


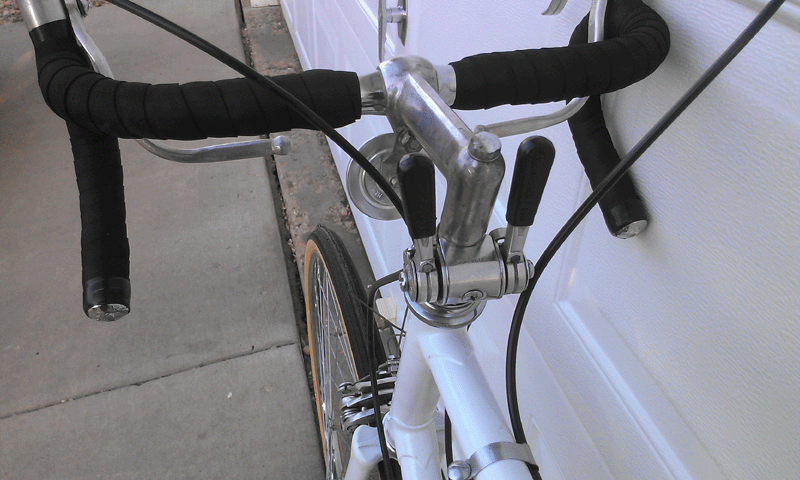
 The finished product..


As I stood back to take a gander at the rebuilt Chimo, I was quite impressed with the overall engineering of this bike.  It has a sharp looking lugged steel frame that is surprisingly light.  The seat tube and head tube have fairly steep angles of around 70 degrees (give or take a few degrees).  


This bike was made when lots of road racing bikes were hitting the market, which might explain why the bottom bracket that houses the cranks is a full 13 inches off of the ground.  A bottom bracket that sits this high, allows you to lean the bike down around corners at an incredibly steep angle even while pedaling.  I'm not so sure I've ever owned or even seen a bike with a bottom bracket this high off of the ground.  It's really very impressive (to me anyway).  


Mark ended up giving this bike back to his father as a birthday present, and I happened to be there when he presented the gift.  His old man was ecstatic, and had no clue that the bike even still existed.  Instantly, memories of past rides on his bike started flooding back to him.  He couldn't believe he was once again reunited with his old bike, that had brought him so much joy and adventure over the years.  I could relate to exactly how he was feeling, which made being part of this whole experience more than worthwhile.

I was amazed at how great this bike held up over the years.  The majority of parts on this bike are original, and needed nothing more than cleaning, resurfacing, and lubrication.  Below is a list of every item I had to replace..


Two new tires and inner tubes
era specific bicycle seat
era specific kickstand
era specific frame cable clamps
brake and derailleur cables
front and rear derailleurs
Shimano gear shift lever set
handlebar tape
a few assorted nuts and bolts


Many folks see bikes in this type of condition and write them off as trash or scrap, but I'm the complete opposite.  I always see them as a blank canvas, or as bikes that simply need a little.. or a lot of TLC.

There's definitely a sense of relief, pride, and satisfaction that floods over me after a bike build is complete, and it's always a bit sad to me when a project is finished.  That rebuild will by no means be my last rodeo, and I'm sure it won't be long until I share results from my next retro project here on this site.